Using CX File Explorer is super easy because of its user-friendly interface. You need not worry about managing photos, videos, documents, apps, and large-sized files. Users access cloud platforms and remote devices. Compressing, restoring, editing, deleting, copying, and transferring your data through this amazing app is not a big deal.
If you need guidance on how to use CX File Explorer APK, we provide complete details about its interface and how to access its features.

Main Interface:
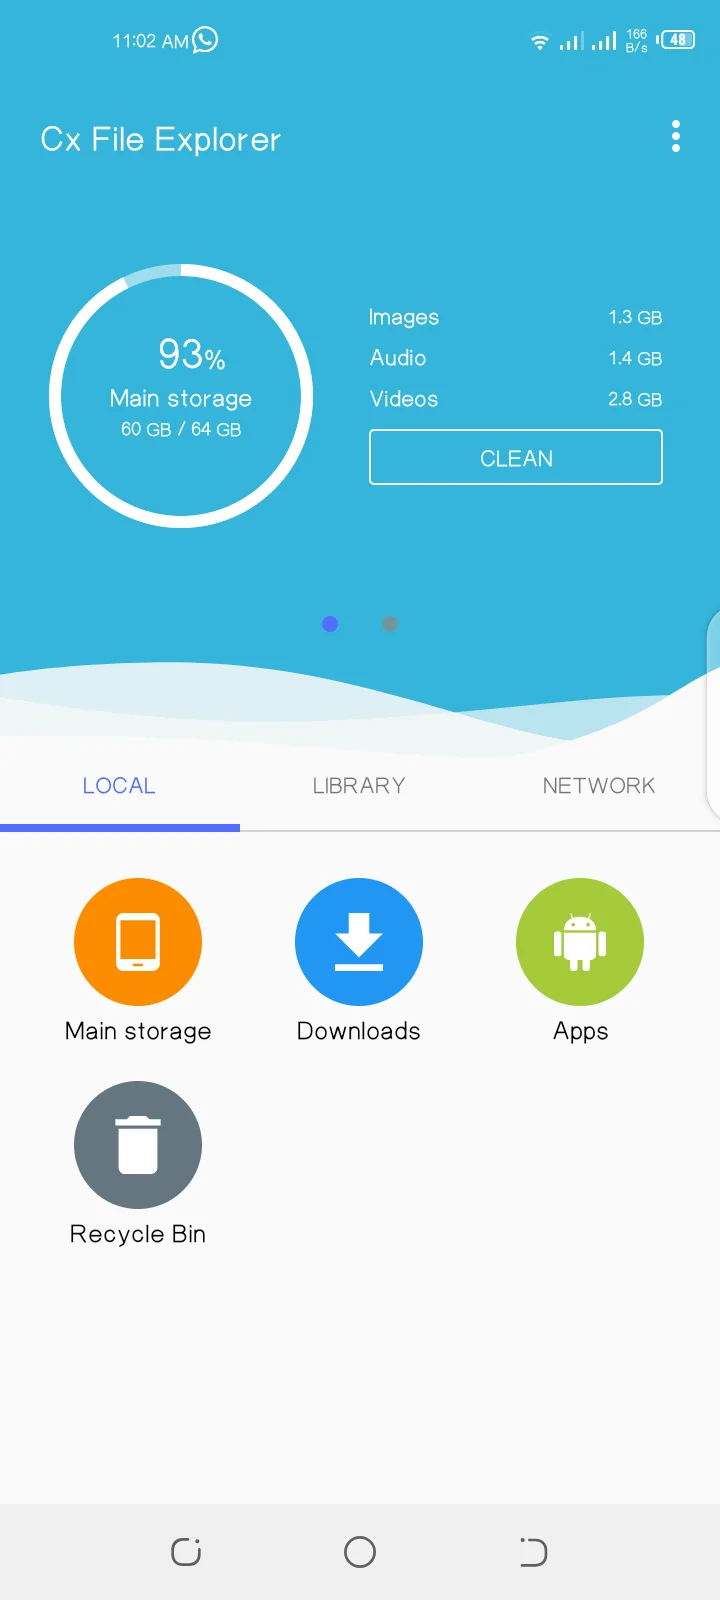
When you open CX Explorer, an interface that analyzes your main and SD card storage appears. It is easy to manage all your videos, documents, and files with a single click. By tapping on the “clean” option, you will free up space on your device. This interface tells how much (KB, MB, or GB) space your data occupies.

Settings Option:
When you look at the top right corner of cx Explorer, there are 3 dots. Tap on them and select “Settings.” Now you will see many options.
Default App:
This option provides you with the facility to open your photos, videos, and other documents in the app that is more suitable for you.
Built-in Apps:
It gives you the option to uncheck the given apps that you don’t want to manage through your file manager.
Notification Setting:
This app wants to notify you about the occupied space above certain selected levels to take action accordingly to clean up your space. In the latest version, 2.2.0, the limit is beyond 98% of storage.
Recycle Bin Setting:
1) Use the recycle bin by default: By allowing this option, you are enable to move your unnecessary files and data into the trash to free up space. It permits you to restore the data that you have accidentally moved to the trash.
2) Recycle confirmation: By enabling recycle confirmation, you will get a notification upon completion of the task.
Advanced Settings:
1) Detect the USB connection: You should check this feature because whenever a USB device is connected then it will ultimately detect and perform accordingly.
2) Show system storage: By selecting this feature, a settings option like an icon appears in the local tab. Tap on it, and you will get access to the files that are being used by your device.
3) File size unit: Manage to view your file size in GB or GiB units. By selecting a certain unit all your data will be shown in that specified unit.
Show Advanced Menus:
1) Add to home screen button: Here you will get a chance to create a shortcut for any app or folder on the home screen, so it becomes easy to get frequently used apps and folders without opening your file manager.
2) Hide/unhide: Hide any folder you don’t want to make private and then unhide it as well.
3) Open as: Allow check to open the file in any preferred app instead of the default one.
About:
Finally, here you will get the version of your CX file explorer installed from the Google Play Store. By the way, I am using the latest version, 2.2.0.
By clicking on it, a new interface appears. Here you will find their privacy policy terms and open-source license. Check “usage and diagnostic” and “debug mode.” By enabling it, your CX file explorer help in debugging.
Customization:
Arrange your images, documents, videos, files, and apps based on date and name. Select the layout in tile form, tile with details, or block style. Change the size of the icons according to your preferences.
Select any file or folder and choose a three-bullet style option with three dots at the top right corner of your screen. By selecting this, you will see three different ‘view’ options, and below them manage the icon size.
Select “apply to all folders.” Or uncheck it to apply for any particular file individually. You will see any hidden file or folder to manage it by tapping on the “show hidden files” feature.
Compressing Files In CX Explorer:
By creating a zip file you will be able to compress it and ultimately, it will free up some space on your Android device. First of all, go to the local tab and select any item you want to compress. Choose the file and then click on “more” and then select “compress.” So, you will be able to get a zip file format of that file.
Now let’s discuss the three main tabs of CX File Manager:
Local:
1) Main storage: Here most of your device’s data is stored, and you get access to all the files and folders on your Android.
2) SD card: This option lets you know what you are hiding inside your memory card. All your apps, media, and documents that have occupied space on your SD card are shown here.
3) Downloads: All your downloaded material is saved under this option. The latest one will appear first according to the set date.
4) Apps: The apps on your phone are here to manage and customize them. By selecting the checkbox, it enables you to uninstall, backup, and share these apps as well.
5) Recycle bin: Delete unnecessary files and folders through this option. The restore option is available in case you need any deleted items.
Library:
This tab allows you to manage your images, audio, videos, and documents. It’s designed to make it easy for you to find what you need and when you need it.
Note: Create a new file and folder by selecting the three-dot option inside the local and library tabs.
Network:
This tab allows you to connect with cloud and remote networks. By clicking on the network tab, the ‘new location’ option appears; selecting cloud will grant you access to your Dropbox, Google Drive, OneDrive, and Box accounts. You just need to sign in through your relevant account to continue. The remote platforms include local networks, SMB, FTP, SFTP, and WebDAV.
Transfer files between devices by clicking the “access from network” option. Here, you need to give your password, and you are all connected to transfer files smoothly.
Tip: Use the search option represented by the magnifying glass icon to get access to any app or file instantly.
FAQ’s
Is this app available on the Google Play Store and free to use?
Yes, this app is available on the Google Play Store free of charge. You must try this app once to manage all your data.
Is it possible to use it on multiple devices?
Yes, it is designed to work across multiple Android devices. Install the app on all your devices and access your files and folders from anywhere.
Does it have the option to view files in different file formats?
Yes, it covers common types of doc formats such as TXT, PDF, DOC, and XLS. Some popular media formats include JPEG, PNG, GIF, MP4, AVI, and MKV.
Conclusion
Simply put, organize the data on your Android device with the help of the CX file explorer. Organizing through a file manager is not a difficult task because of its easy-to-use interface and well-defined features. Enable theme customization, manage occupied space, boost up your phone’s speed, and access your cloud storage device through this app.
